Search Users Guide
Firewall Builder can be used to generate a policy for the firewall running on the server. Here is an example that shows how to set up a policy to permit access to different ports on the server. First of all, we need to create a firewall object to represent our server. The only difference between this case and a usual case where firewall protects one or more networks behind it is that for the server-firewall we only need to create one interface besides the loopback. The following screenshot demonstrates a policy that permits access to the web server running on this machine (both HTTP and HTTPS), as well as FTP and management access via SSH. Rule #1 allows the server to use DNS for name resolution. The service object used in the "Service" column in rule #1 is in fact a group that consists of TCP and UDP service objects that represent TCP and UDP variants of the protocol (both use the same destination port 53).
In this example, I turned the option "Assume firewall is part of any" off to simplify generated script. Here is the iptables script created for these rules:
# Rule 0 (global)
#
$IPTABLES -A INPUT -p tcp -m tcp  -m multiport  --dports 80,443,21,22 \
     -m state --state NEW  -j ACCEPT
#
# Rule 1 (global)
#
$IPTABLES -A OUTPUT -p tcp -m tcp  --dport 53  -m state --state NEW  -j ACCEPT
$IPTABLES -A OUTPUT -p udp -m udp  --dport 53  -m state --state NEW  -j ACCEPT
#
# Rule 2 (global)
#
$IPTABLES -N RULE_2
$IPTABLES -A INPUT  -j RULE_2
$IPTABLES -A RULE_2  -j LOG  --log-level info --log-prefix "RULE 2 -- DENY "
$IPTABLES -A RULE_2  -j DROP
Firewall Builder optimized the generated rule and used the module multiport to put all four TCP ports used in rule #0 in one iptables command. The program always uses the module multiport to make generated script more compact, even if you use a mix of TCP, UDP, and ICMP services in the same rule. Since iptables does not support using a mix of protocols in the same command, the program generates several iptables commands, one for each protocol, but still can use the module multiport in each command if there are several ports to match.
Rule #1 was split because it matches both TCP and UDP protocols. Because of that, in the generated iptables script we have one command for tcp and another for udp.
Note how iptables commands generated for rule #0 went into chain INPUT, whereas commands generated for rule #1 went into chain OUTPUT. Rule #0 controls access to the server (object "server" is in "Destination" in the rule) but rule #1 controls connections initiated by the server (object "server" is in "Source" of the rule). Firewall Builder picks the right chain automatically.
Generated PF script uses tables to match four tcp ports in the same rule:
# Rule  0 (global)
#
pass in   quick inet proto tcp  from any  to 192.168.1.10 \
    port { 80, 443, 21, 22 } keep state
#
# Rule  1 (global)
#
pass out  quick inet proto tcp  from 192.168.1.10  to any port 53 keep state
pass out  quick inet proto udp  from 192.168.1.10  to any port 53 keep state
#
# Rule  2 (global)
#
block in   log  quick inet  from any  to 192.168.1.10
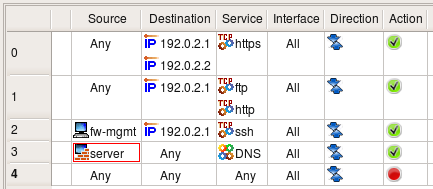
Sometimes the web server is bound to several IP addresses on the same machine. One typical situation when this is needed is when the web server supports multiple sites using the HTTPS protocol. The following firewall configuration demonstrates the case when interface eth0 has two IP addresses (192.0.2.1 and 192.0.2.2):
Suppose the web server should accept HTTPS connections to both IP addresses, while HTTP and FTP are allowed only on address 192.0.2.1. The management access to the server is allowed only via protocol SSH and only from the management workstation "fw-mgmt". The following rules enforce this policy:
Note
The same rules could be used to permit or deny access to different ports on a server located on the network behind a dedicated firewall.
Here is how generated iptables script looks like:
# Rule 0 (global)
#
$IPTABLES -A INPUT -p tcp -m tcp -d 192.0.2.1 --dport 443 -m state --state NEW \
    -j ACCEPT
$IPTABLES -A INPUT -p tcp -m tcp -d 192.0.2.2 --dport 443 -m state --state NEW \
    -j ACCEPT
#
# Rule 1 (global)
#
$IPTABLES -A INPUT -p tcp -m tcp -m multiport -d 192.0.2.1 --dports 80,21  \
    -m state --state NEW  -j ACCEPT
#
# Rule 2 (global)
#
$IPTABLES -A INPUT -p tcp -m tcp -s 192.0.2.100 -d 192.0.2.1 --dport 22  \
    -m state --state NEW  -j ACCEPT
#
These iptables commands should be quite obvious. PF rules in this example also look very familiar:
# Tables: (1)
table <tbl.r0.d> { 192.0.2.1 , 192.0.2.2 }


# Rule  0 (global)
#
#
pass  quick inet proto tcp  from any  to <tbl.r0.d> port 443 keep state
#
# Rule  1 (global)
#
#
pass  quick inet proto tcp  from any  to 192.0.2.1 port { 80, 21 } keep state
#
# Rule  2 (global)
#
#
pass  quick inet proto tcp  from 192.0.2.100  to 192.0.2.1 port 22 keep state
Copyright © 2000-2012 NetCitadel, Inc. All rights reserved.
Using free CSS Templates.


