Search Users Guide
Suppose you have a scenario where you want the firewall to perform a number of operations on packets that match a particular firewall rule. For example, you might want packets matching the rule to be marked (tagged), classified and then accepted. Instead of defining multiple single-action rules to accomplish this behavior, Firewall Builder allows you to combine a set of rule options with an action in a single rule. The ability to specify multiple operations for a single rule helps keep the number of required rules to a minimum, and keeps your rule set simpler and more readable.
Some target firewall platforms, such as PF, natively support performing multiple operations per rule. Other firewall platforms, such as iptables, do not explicitly support configuring multiple operations per rule. For these platforms, Firewall Builder automatically transforms the configured policy into however many rules are required by the target platform.
Let's look at an example where traffic matching a particular rule, such as the one shown in Figure 7.42. This rule matches SSH traffic destined to a specific address.
The way the rule is currently defined traffic matching the rule will be accepted and no other operations will be performed. However, if in addition to accepting the traffic you also want to classify the traffic into classful qdisc for use with tc, then you need to use the Classify rule option to define the classify value that should be set for traffic matching the rule.
In this example we will use a qdisc value of 1:20 which matches a value configured in tc for prioritizing SSH traffic.
Steps for adding classify string to matching traffic.
- Right-click on Options section of rule and select Rule Options
- Click on Classify tab in the Editor panel at the bottom of the screen
- Enter the value 1:20 in the text box for the Classify string as shown in Figure 7.43
Notice that the Classify icon and classify string value are now displayed in the rule's Options column. This lets you quickly and easily see what options have been configured for a particular rule.
Using the Section 10.2 feature you can see that this rule will result in the following iptables commands being generated.
$IPTABLES -A FORWARD -p tcp -m tcp -d 192.168.2.10 --dport 22 -m state --state NEW \
-j ACCEPT
# Allow SSH to server
$IPTABLES -t mangle -A POSTROUTING -p tcp -m tcp -d 192.168.2.10 --dport 22 -m state \
--state NEW  -j CLASSIFY --set-class 1:20
In this example traffic matching a rule on a PF firewall should be tagged with a tag value that identifies that the traffic is from an internal network that entered the firewall inbound on its internal (em1) network interface.
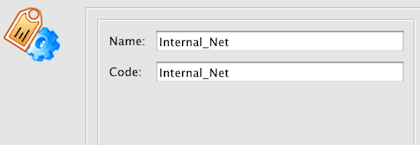
First, a TagService object needs to be created that will identify the tag value that should be applied to the matching traffic. In this case the tag value will be set to "Internal_Net".
- In the object tree right-click on the TagServices folder and select New TagService
- Enter a name for the TagService object
- Enter the tag value that should be applied, in this case "Internal_Net"
The TagService should like like Figure 7.45.
Next, the rule shown in Figure 7.46 matches the internal network traffic inbound on networking interface em1 needs to be created.
Note
If we set the Action to Accept for this rule the packets will be tagged, but they will also be accepted and no other rules will be processed. To tag the packets, but have the firewall continue processing the packets against additional rules we need to set the Action to Continue.
Using the Continue action will allow you to define rules farther down in the policy that make use of the tag. Depending on the version of PF that you are using, this will result in ether "pass" or "match" rules being generated by Firewall Builder.
To set the tag value that will be added to packets that match this rule, do the following:
- Right-click on the Options column of the rule and select Rule Options
- Click on the Tag tab in the Editor panel at the bottom
- Drag-and-drop the TagService object created earlier from the object tree to the the drop target in the Editor panel as shown in Figure 7.47
After the TagService object has been added to the rule, the final rule should look like Figure 7.48.
Using the Section 10.2 feature you can see that this rule will result in the following PF command being generated.
# Tag internal traffic
pass in on em1 inet from 192.168.1.0/24 to any tag Internal_Net label "RULE 0 --  "
On more recent versions of PF using the Continue Action in a rule will result in the "match" keyword being used. Here's an example of the same rule from above, but with a configuration generated for a firewall that is running PF 4.7.
# Tag internal traffic
match in on em1 inet from 192.168.1.0/24 to any tag Internal_Net no state label "RULE 0 --  "
Copyright © 2000-2012 NetCitadel, Inc. All rights reserved.
Using free CSS Templates.


