Search Users Guide
For this example we are going to import a very basic iptables configuration from a firewall that matches the diagram in Figure 6.25.
Firewall Builder imports iptables configs in the format of iptables-save. Script iptables-save is part of the standard iptables install and should be present on all Linux distribution. Usually this script is installed in /sbin/.
When you run this script, it dumps the current iptables configuration to stdout. It reads iptables rules directly form the kernel rather than from some file, so what it dumps is what is really working right now. To import this into Firewall Builder, run the script to save the configuration to a file:
iptables-save > linux-1.conf
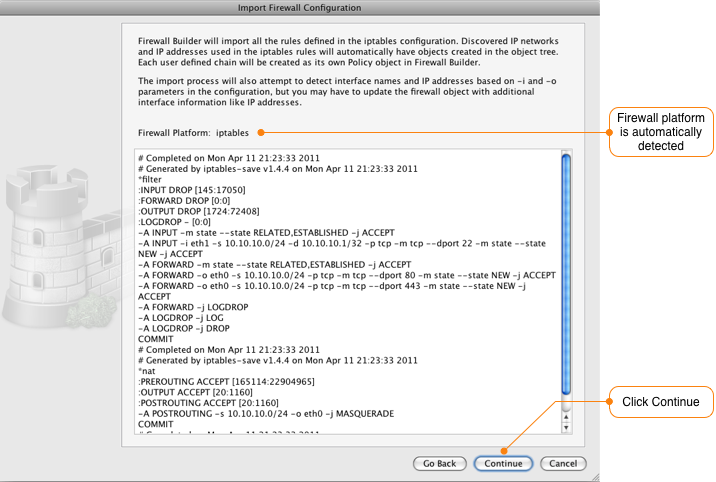
As you can see in the output below, the linux-1.conf iptables configuration is very simple with only a few filter rules and one nat rule.
# Completed on Mon Apr 11 21:23:33 2011
# Generated by iptables-save v1.4.4 on Mon Apr 11 21:23:33 2011
*filter
:INPUT DROP [145:17050]
:FORWARD DROP [0:0]
:OUTPUT DROP [1724:72408]
:LOGDROP - [0:0]
-A INPUT -m state --state RELATED,ESTABLISHED -j ACCEPT
-A INPUT -i eth1 -s 10.10.10.0/24 -d 10.10.10.1/32 -p tcp -m tcp --dport 22 -m state --state NEW -j ACCEPT
-A FORWARD -m state --state RELATED,ESTABLISHED -j ACCEPT
-A FORWARD -o eth0 -s 10.10.10.0/24 -p tcp -m tcp --dport 80 -m state --state NEW -j ACCEPT
-A FORWARD -o eth0 -s 10.10.10.0/24 -p tcp -m tcp --dport 443 -m state --state NEW -j ACCEPT
-A FORWARD -j LOGDROP
-A LOGDROP -j LOG
-A LOGDROP -j DROP
COMMIT
# Completed on Mon Apr 11 21:23:33 2011
# Generated by iptables-save v1.4.4 on Mon Apr 11 21:23:33 2011
*nat
:PREROUTING ACCEPT [165114:22904965]
:OUTPUT ACCEPT [20:1160]
:POSTROUTING ACCEPT [20:1160]
-A POSTROUTING -s 10.10.10.0/24 -o eth0 -j MASQUERADE
COMMIT
# Completed on Mon Apr 11 21:23:33 2011
If you are running Firewall Builder on a different system than the
one that is running iptables copy linux-1.conf
from the firewall to the system where Firewall Builder is running.
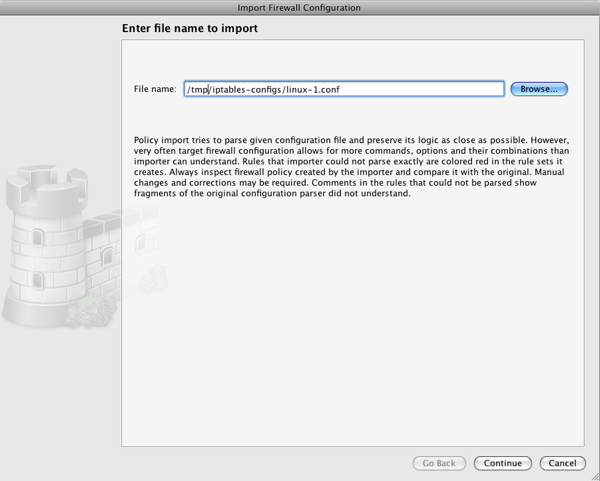
Launch the Import wizard by selecting the File -> Import Firewall menu item.
Click to find linux-1.conf.
Click to move to the next window which shows a preview of the configuration file that will be imported and the type of firewall that Firewall Builder has detected it to be.
Next you need to enter a name for the firewall. This is the name that will be used in Firewall Builder to refer to the firewall after it is imported. When you click the Commit button the configuration data will be read.
By default, Firewall Builder attempts to detect if there are items, like IP addresses, used in the rules that match existing items in the object tree. If there is a match the existing item is used, if there is no match a new object is created. This feature can be disabled by unchecking the box next to "Find an use existing objects" which will result in objects being created for evry item used in the imported rules regardless of whether it already exists in the object tree or no.
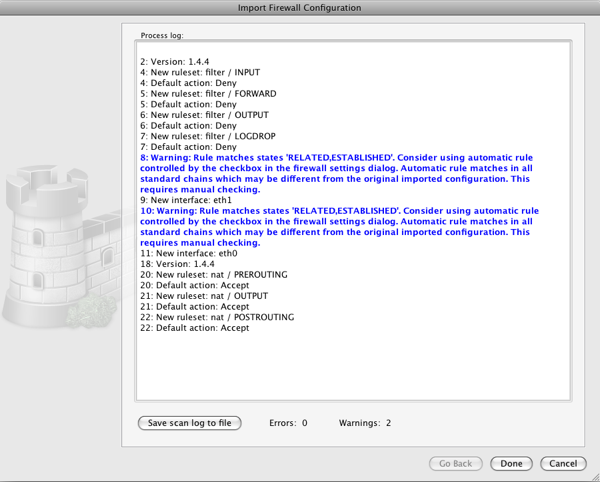
After the import is complete, Firewall Builder displays a log showing all the actions that were taken during the import. Warning messages are displayed in blue font and Error messages are displayed in red.
The program tries to interpret the configuration file rule by rule and recreates the equivalent rule in Firewall Builder. The progress window displays warning and error messages, if any, as well as some diagnostics that shows network and service objects created in the process.
Note
Firewall Builder detected that there are rules in the iptables configuration that allow RELATED and ESTABLISHED traffic through the firewall. This behavior can be controlled by a setting in Firewall Builder, so a warning message is shown.
Click the Done button to complete the firewall import.
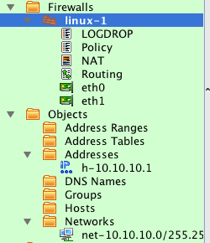
After the import is completed, the newly created firewall object will be displayed in the object tree. If you expand the Objects system folder, as shown in Figure 6.30, you can also see the Address and Network objects that were created during the import process.
After the firewall object is created in the object tree there are typically a few more steps required in order to be able to manage your firewall configuration using Firewall Builder.
Interfaces
There is not enough information in the iptables configuration for Firewall Builder to deterministically determine what interfaces and IP addresses are configured on the firewall. During the import if a rule contains either "-i" or "-o" interface references Firewall Builder will add the interface to the firewall object, but some interfaces may not be used in rules and therefore will not be detected.
In the example configuration that was imported for linux-1, both the eth0 and eth1 interfaces were used in the configuration, so the firewall object includes these interfaces. By default Firewall Builder marks these interfaces as Unnumbered.
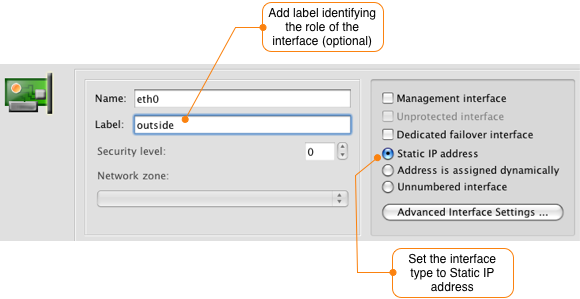
To update the eth0 interface, double-click it to open it for editing. Figure 6.31 shows how to set a label for the interface and to identify that it should have a static IP address.
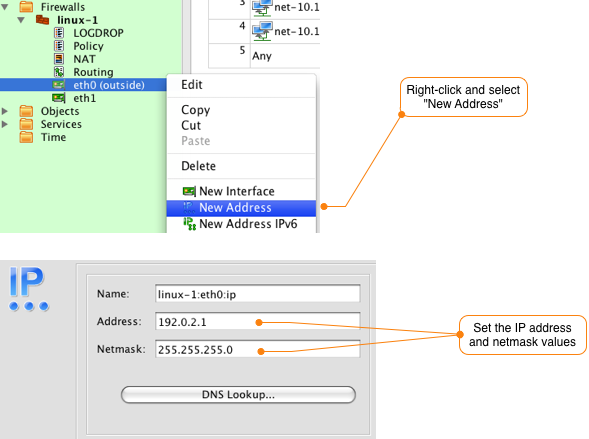
Right-click the interface and select New Address to add an IP address to the interface as shown in Figure 6.32. Set the IP address and netmask to match your environment.
Note
You may also need to add additional interfaces to the firewall object depending on what Firewall Builder was able to detect from the iptables rules. To add a new interface right-click the firewall object (in our example linux-1) and select New Interface. Add the interface name and label and set the type. The default type is Static IP address.
Rules
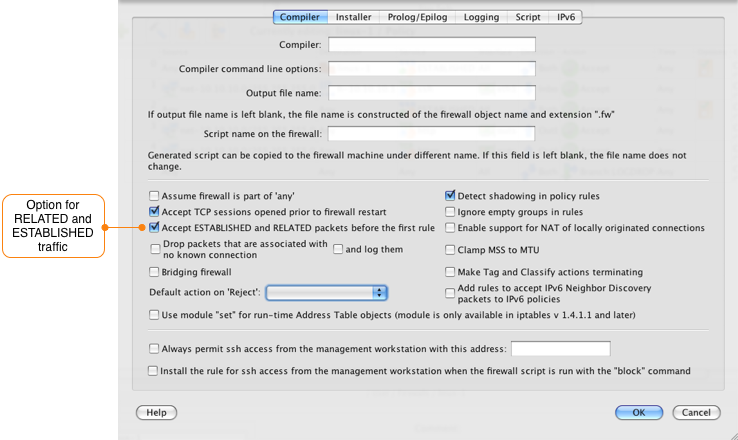
During the import of the linux-1.conf file. Firewall Builder displayed a warning message that there were rules defined to allow RELATED and ESTABLISHED traffic to the firewall. Instead of having to explicitly have a rule for this, Firewall Builder has a configuration option controlling this behavior.
To view the configuration option controlling RELATED and ESTABLISHED traffic double-click on the firewall object and click on the Firewall Settings button in the Editor Panel. The dialog window will open with the Compiler tab selected. About halfway down the window is the checkbox that controls RELATED and ESTABLISHED traffic, which is enabled by default.
Since the default is to allow RELATED and ESTABLISHED traffic, the imported rules 0 and 2 are not necessary. To remove these rules right-click the rule number and select Remove Rule.
Note
The specific rule numbers will vary based on your configuration, but the rules created for matching RELATED and ESTABLISHED traffic are identifiable by the use of the predefined ESTABLISHED objct in the Service field of the rule.
NAT rules
To view the imported NAT rules, double-click the NAT object under the linux-1 object in the tree. In this example, there is a single source NAT rule that translates inside addresses to the eth0 (outside) interface of the firewall.
User-Defined Chains
If your iptables configuration includes user-defined chains, Firewall Builder will create a new Policy object for each user chain and will use the Branch feature to jump from the main Policy to the user chain Policy. In our example linux-1.conf configuration there is a user chain called LOGDROP that has 2 rules. The first rule logs the packet and the second rule drops it.
To view the rules in the LOGDROP policy, double-click the LOGDROP policy object located under the linux-1 firewall object. This will open the rules in the Rules Editor as shown in Figure 6.36.
Copyright © 2000-2012 NetCitadel, Inc. All rights reserved.
Using free CSS Templates.


