Search Users Guide
This example shows how you can use Firewall Builder to classify traffic and then use the Linux Traffic Control (tc) feature to rate limit the amount of bandwidth that a specific application can use.
For this example we will be using Firewall Builder to configure a Linux host with a webserver. The generated firewall script will be run directly on the webserver and this is also where the traffic shaping will be done. The goal of this example is to limit the total bandwidth used for HTTP traffic to be 2Mbps or less. You can extend the same principles to more complex scenarios using more advanced features in tc.
Defining the classification in Firewall Builder
First we need to create an object with the source port set to 80. This corresponds to the HTTP traffic leaving the server which is what we want to limit.
Next we need to decide what classification class ID we want to use for this traffic. This is the value that will be configured in Firewall Builder to have iptables set the "-j CLASSIFY --set-class" target and value. For this example we are going to use class ID 1:10.
To set the class ID for the HTTP traffic originating from the server, we need to add a rule that allows the traffic as shown in the Figure 14.176.
To create this rule the following was done:
- Set Source to firewall object, in our case web-1
- Set the Service to be the HTTP source object were created previously
- Set the Action to be Classify
- Turn logging off (optional)
When we set the Action to Classify, the Editor Panel provides an input box where we can set the class ID value. In this case we used 1:10 as shown in Figure 14.177 below.
Configuring tc to rate limit traffic
In this example we want to limit the amount of HTTP traffic being served by this server to 2Mbps. This might be due to usage charges, limited available bandwidth, etc.
Once the traffic has been set with the class ID, in our case we used 1:10, you can use Traffic Control (tc) to match the class ID and limit the bandwidth for a specific class ID. Tc is configured through a set of commands run from a shell. You can find out more about available tc commands by typing "man tc".
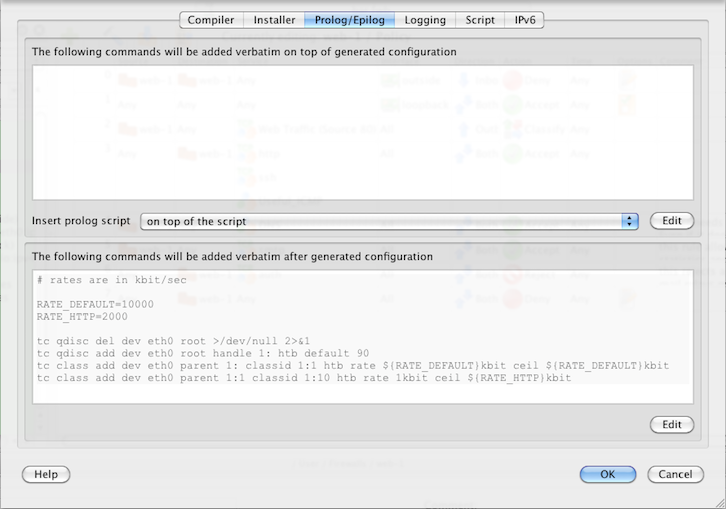
In this case we want the tc commands to be run every time the Firewall Builder generated script is run, so we are going to add them to the Epilog of the web-1 firewall object.
Double-click the firewall object to open it for editing and then click on the Firewall Settings button in the editor panel. Click on the Prolog/Epilog tab and add the following commands in the Epilog window.
# rates are in kbit/sec

RATE_DEFAULT=10000
RATE_HTTP=2000

tc qdisc del dev eth0 root >/dev/null 2>&1
tc qdisc add dev eth0 root handle 1: htb default 90
tc class add dev eth0 parent 1: classid 1:1 htb rate ${RATE_DEFAULT}kbit ceil ${RATE_DEFAULT}kbit
tc class add dev eth0 parent 1:1 classid 1:10 htb rate 1kbit ceil ${RATE_HTTP}kbit
Your configuration should now look like Figure 14.178.
While this example showed controlling bandwidth from a single host, you can also apply the same concepts to a network firewall that provides traffic shaping for multiple systems on a network.
Copyright © 2000-2012 NetCitadel, Inc. All rights reserved.
Using free CSS Templates.


