Search Users Guide
Another powerful way to find addresses of subnets and hosts on the network is to use the SNMP crawler.
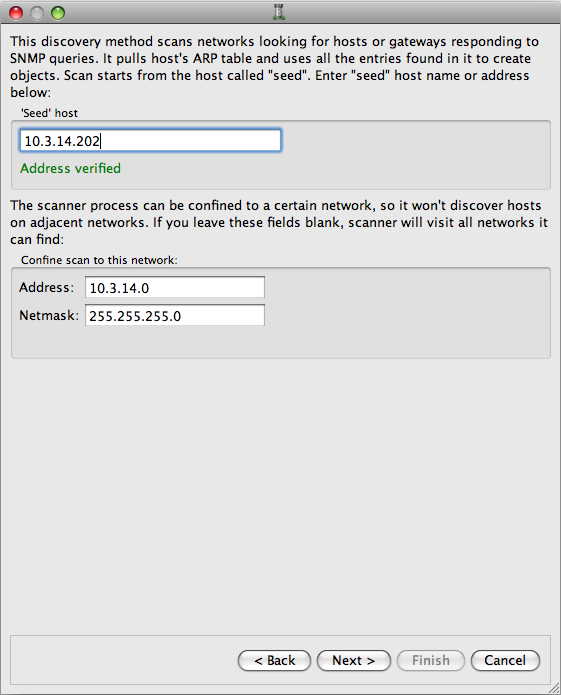
The Network Discovery program (sometimes referred to as the "Network Crawler") needs a host from which to start. This host is called the "seed host"; you enter it in the first page of the Druid ( Figure 6.8). The crawler implements the following algorithm (this is a somewhat simplified explanation):
First, it runs several SNMP queries against the seed host trying to collect the list of its interfaces and its ARP and routing tables. This host is then added to the table of discovered network objects, together with the host's interfaces, their addresses and netmasks, and the host's "sysinfo" parameters. Then the crawler analyses the routing table of that host; this allows it to discover the networks and subnets, which in turn are also added to the list of discovered objects. Then it analyses the ARP table, which holds MAC and IP addresses of neighboring hosts. It takes one host at a time from this table and repeats the same algorithm, using the new host as a seed host. When it pulls an ARP table from the next host, it discards entries that describe objects it already knows about. However, if it finds new entries, it tries them as well and thus travels further down the network. Eventually, it will visit every host on all subnets on the network.
This algorithm relies on hosts answering SNMP queries. If the very first host (the "seed" host) does not run an SNMP agent, the crawler will stop on the first run of its algorithm and won't find anything. Therefore, it is important to use a host which does run an SNMP agent as a "seed" host. Even if most of the hosts on the network do not run SNMP agents, but a few do, the crawler will most likely find all of them. This happens because it discovers objects when it reads the ARP tables from the host which answers; so even if discovered hosts do not answer to SNMP queries, the crawler can discover them.
One of the ways to limit the scope of the network that the crawler visits is to use the "Confine scan to the network" parameter. You need to enter both a network address and a netmask; the crawler will then check if the hosts it discovers belong to this network and if they do not, discard them.
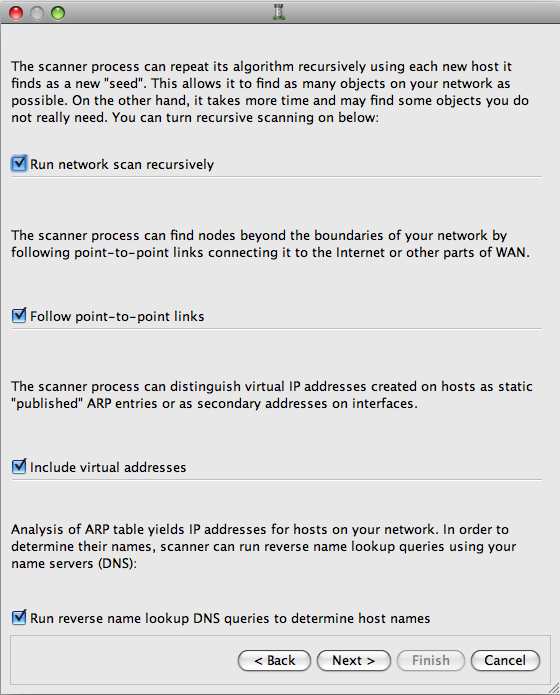
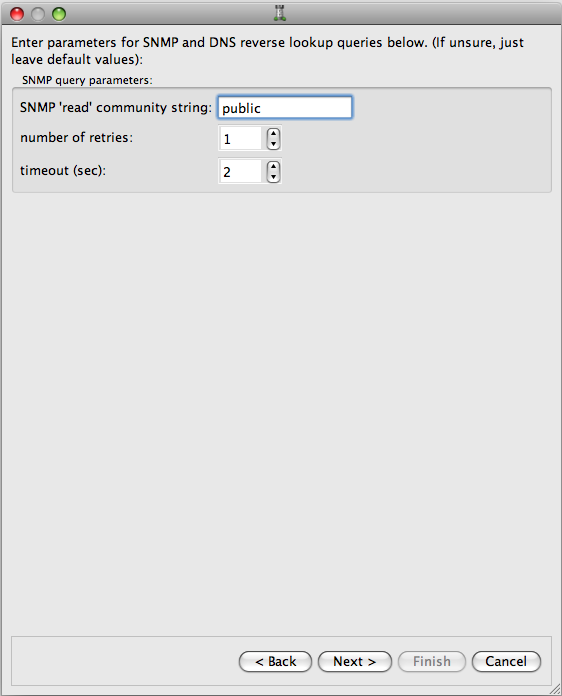
There are a few settings that affect the crawler's algorithm (see Figure 6.9 and Figure 6.10). Here is the list:
-
Run network scan recursively
As was described above, the crawler starts with the "seed" host and then repeats its algorithm using every discovered host as a new "seed". If this option is turned OFF, then the crawler runs its algorithm only once and stops.
-
Follow point-to-point links
If a firewall or router has a point-to-point interface (for example, PPP interface), then the crawler can automatically calculate the IP address of the other side of this interface. It then continues the discovery process by querying a router on the other side. Very often, the point-to-point link connects the organization's network to an ISP and you are not really interested in collecting data about your ISP network. By default, the crawler does not cross point-to-point links, but this option, if activated, permits it.
-
Include virtual addresses
Sometimes servers or routers have more than one IP address assigned to the same interface. If this option is turned on, the crawler "discovers" these virtual addresses and tries to create objects for them.
-
Run reverse name lookup queries to determine host names
If a host discovered by the crawler answers to SNMP queries, it report its name, which the crawler uses to create an object in Firewall Builder. However, if the host does not answer the query, the crawler cannot determine its name and only knows its IP address. The crawler can use DNS to back-resolve such addresses and determine host names if this option is turned ON.
-
SNMP (and DNS) query parameters
You must specify the SNMP "read" community string to be used for SNMP queries. You can also specify the number of retries and a timeout for the query. (The number of retries and timeout parameters also apply to DNS and reverse DNS queries.)
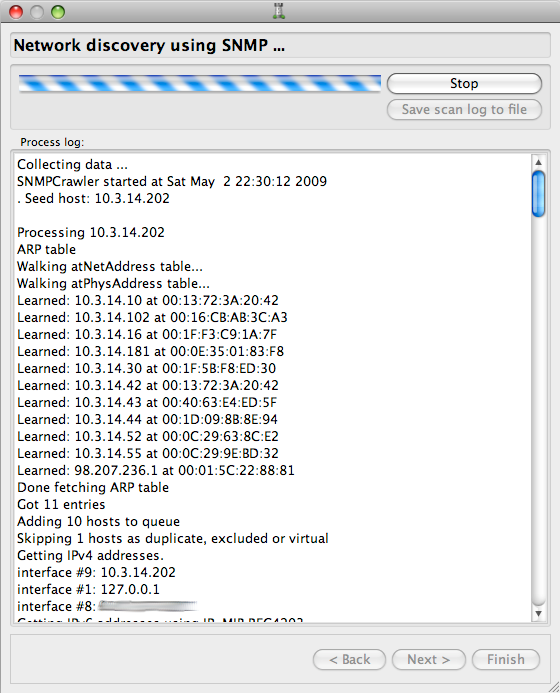
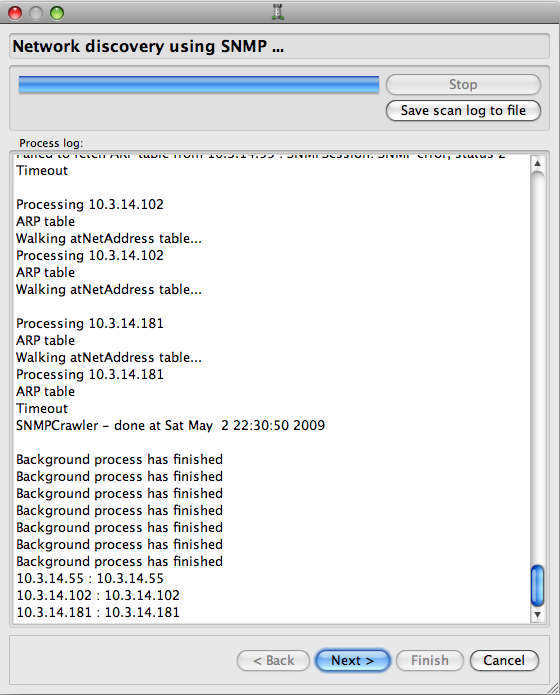
Once all parameters are entered, the crawler actually gets to work, which may take a while. Depending on the size of the network and such parameters as the SNMP timeout value, scanning may take minutes or even hours. The progress of the scanner can be monitored on the page in the Druid (Figure 6.11) and (Figure 6.12). You can always stop the crawler using the button. Data does not get lost if you do this as the Druid will use whatever objects the crawler discovered before you stopped it.
The button saves the content of the progress window to a text file and is mostly used for troubleshooting and bug reports related to the crawler.
If the crawler succeeded and was able to collect information it needed to create objects, you can switch to the next page where you choose and create objects.
This part of the Druid is the same for all discovery methods.
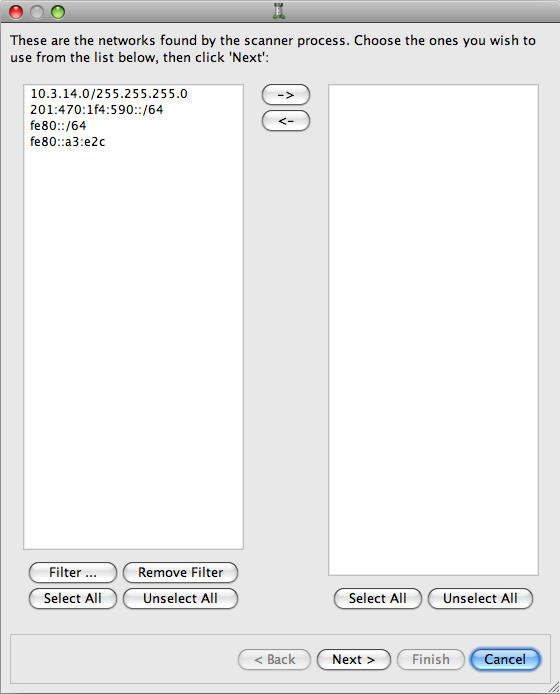
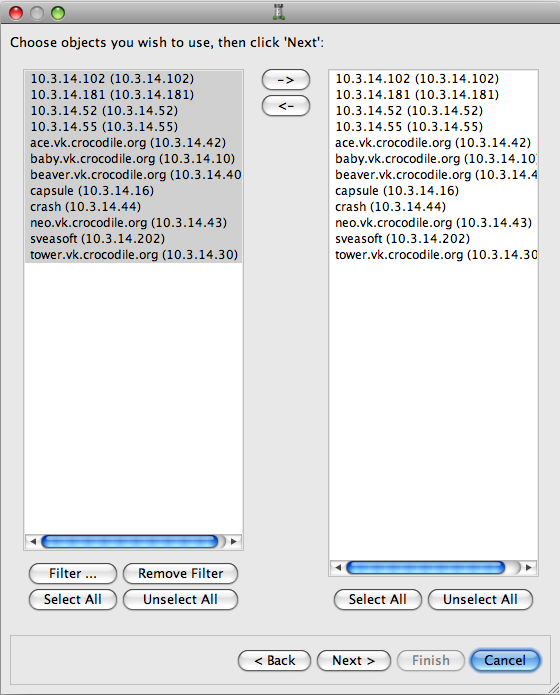
The left column shows the networks that were discovered. The right column shows the network objects that will be created. To start with, the right column is empty.
This page of the Druid also has the following buttons:
-
Selects all records in the column.
-
Deselects all records in the column.
-
Brings up a filter dialog. Filtering helps manage long lists of objects.
-
Removes the currently applied filter and shows all records in the table.
The Druid can filter records in the table either by their address, by their name, or by both. To filter by address enter part of it in the "Address" field. The program compares the text entered in the filter dialog with an address in the table and shows only those records whose address starts with the text of the filter. For example, to only filter out hosts with addresses on the net 10.3.14.0 we could use the filter "10.3.14". Likewise, to remove hosts "bear" and "beaver" (addresses 10.3.14.50 and 10.3.14.74) we could use the filter "10.3.14.6". Note that the filter string does not contain any wildcard symbols like "*". The filter shows only records that have addresses which literally match the filter string.
Filtering by the object name uses the POSIX regular expressions syntax described in the manual page regex(7). For example, to find all records whose names start with "f" we could use the regular expression "^f". The "^" symbol matches the beginning of the string, so this regular expression matches any name that starts with "f". To find all names that end with "somedomain.com", we could use the regular expression ".*somedomain.com$"
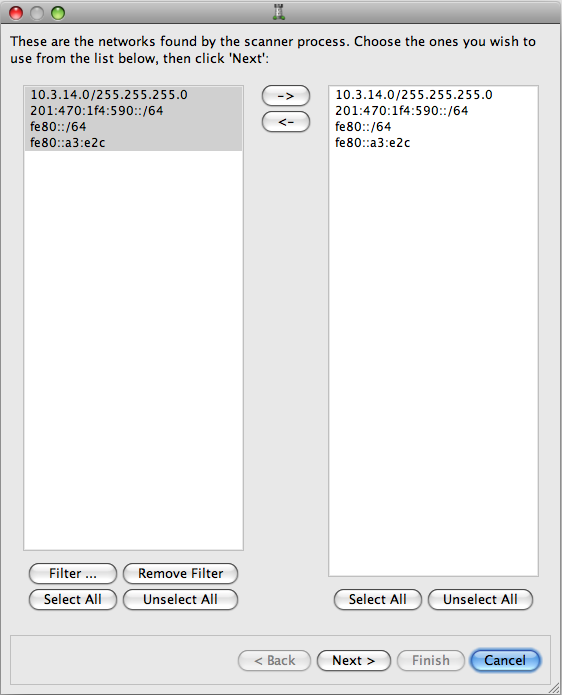
Once you have reviewed the discovered networks, decide which ones you want to turn into Network objects. Then, copy those networks to the right column.
To populate the right column with objects, select the networks you want, then click the right arrow (-->) to put them in the right column.
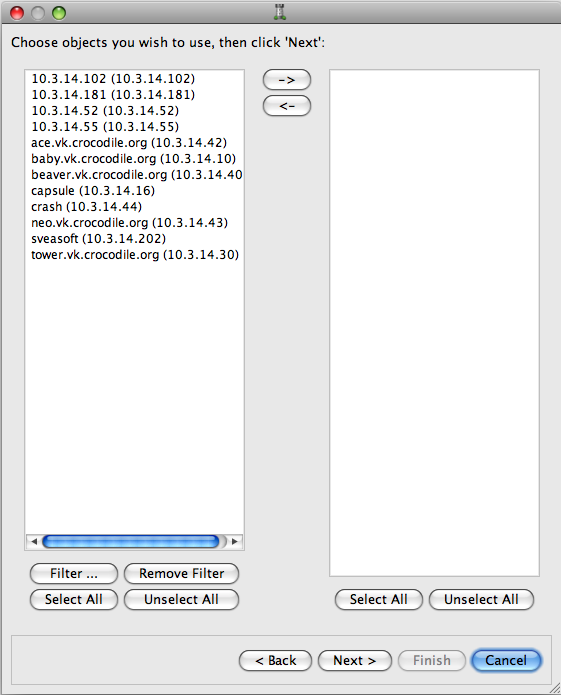
Click . The discovered hosts list displays:
Again, populate the right column with the objects you want to create:
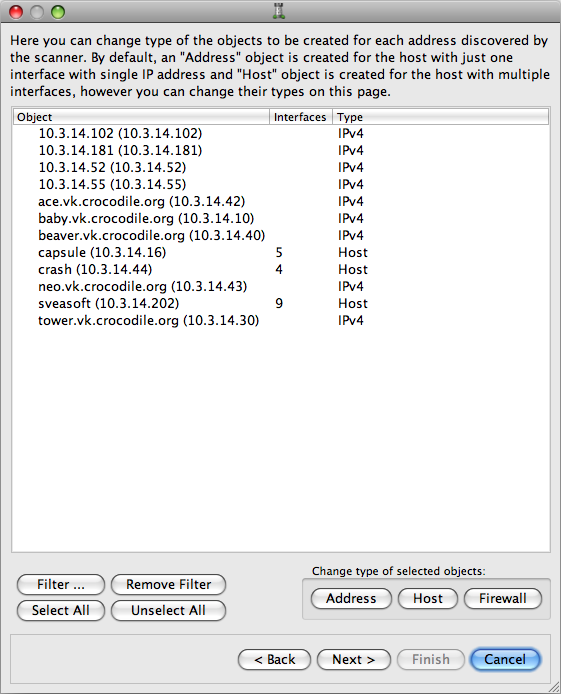
Click . The final object list displays:
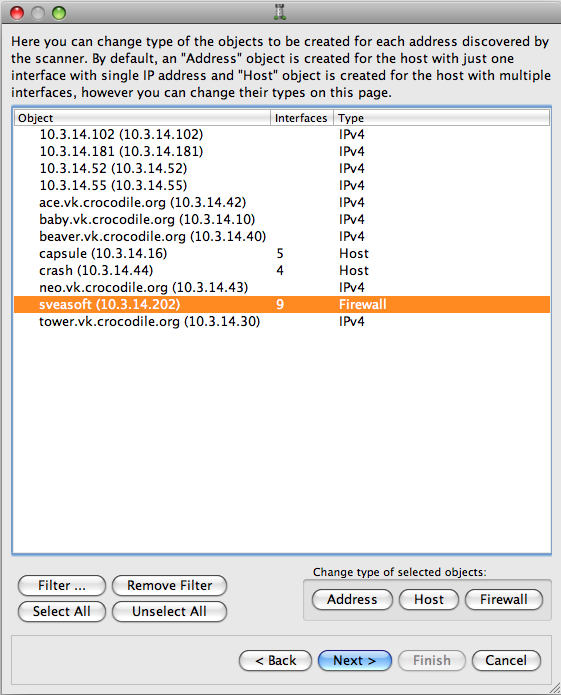
Here you can specify which type of object will be created for each discovered item: address, host, or firewall. Here, we are changing the object "sveasoft (10.3.14.202)" from a host to a firewall:
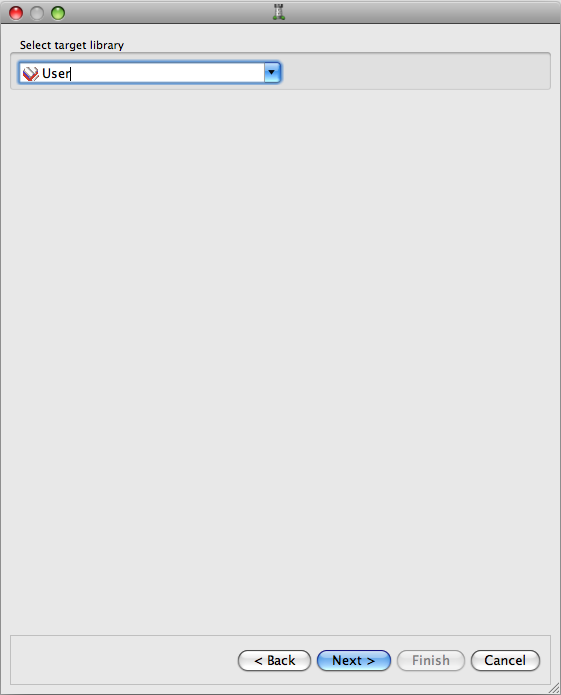
Click . The target library control appears:
Here you can specify which library the objects will appear in. Normally this would be User, unless you have created a user-defined library. Click .
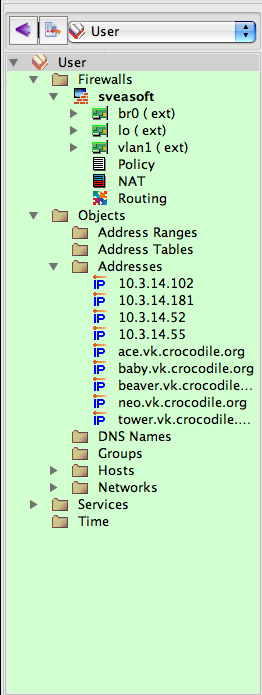
The wizard finishes processing, and your new objects appear in your library:
Copyright © 2000-2012 NetCitadel, Inc. All rights reserved.
Using free CSS Templates.

