Search Users Guide
The Firewall Builder GUI is your workspace for creating and compiling a firewall policy. In the workspace, you create objects, which are logical representations of your servers, network services, subnetworks, and other aspects of your network. You then use these objects in your policy.
You use cFirewall Builder to compile your policy for your target firewall platform, and, if you like, to deploy the policy fto the actual firewall.
This chapter provides a high-level overview of the Firewall Builder GUI and how it works. Later chapters describe using the GUI to accomplish specific tasks.
The Firewall Builder GUI consists of a main window and some dialog boxes. In the next section, we describe the main window.
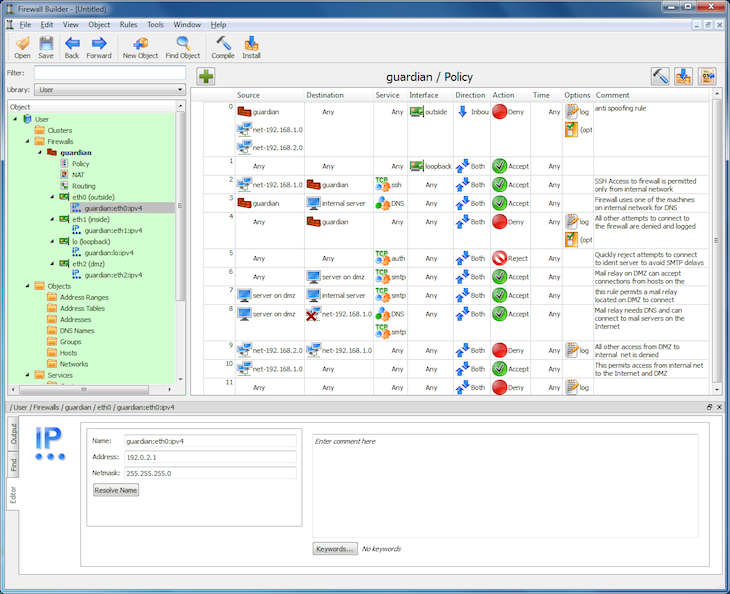
This figure shows the Firewall Builder GUI with a single object file open.
The sections of the main window are as follows:
Table 4.1. Main window
| Window area | Explanation |
|---|---|
| Menus and tool bar | Firewall Builder comes
with menus and a tool bar at the top of the
window.
|
| The Object Tree |
Displayed on the left side of the window, the object tree displays firewalls, hosts, interfaces, services, and other "objects" that you will use when creating policies for your firewall. Section 4.3 describes the objects in the tree and shows how to filter the object tree.
|
| The Policy Rule Set Workspace |
Displayed to the right of the object tree, this area holds the rule set you are currently working on. This space is blank when you first load an object file. It only appears when you double-click a policy, NAT, or routing rule set link in a firewall object. (This means that you have to create a firewall object before you can work on a policy.) See Section 5.2.2 for instructions on creating a firewall object. See Chapter 7 for instructions on working with policies. The + button on the left inserts a new rule in the open policy above the currently selected rule. The buttons on the top right of the policy window are shortcuts to compile, compile-and-install and inspect generated files.
|
| The Object Editor Dialog |
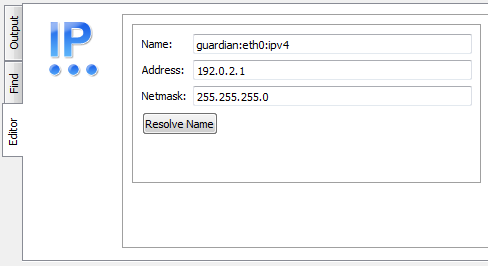
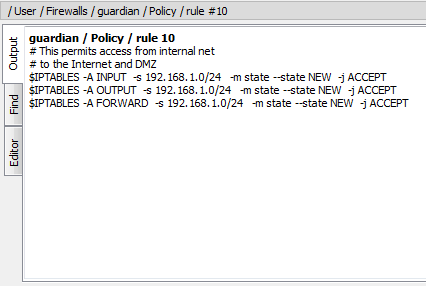
The dialog area, across the bottom of the main window, is where you make changes to object parameters, perform find and replace operations, and view the output from single-rule compiles. The dialog area is not visible until you double-click an object. The dialog has three tabs and three uses: editing an object's parameters, doing a find or find-and-replace on an object, and displaying the output of a single-rule compile run. Close the dialog by clicking the X. In the object editor dialog, you can make changes to an object's parameters. Changes made to a field in the dialog are saved whenever you click out of the field, or when you press the Tab or Enter key. (Note that this does not change the data in the .fwb file until you save the file itself.) If you wish to cancel a change, select . For more information on objects and their parameters, see Chapter 5.
You can search for objects and rule sets across your object files, plus do replacements of objects. See Section 5.7 for an explanation of the Find-and-Replace tab.
You can compile individual rules and see how the rule gets converted into firewall instructions. See Section 14.4.2.3 for details on compiling a single rule and viewing the results in the Output tab.
|
| Undo Stack |
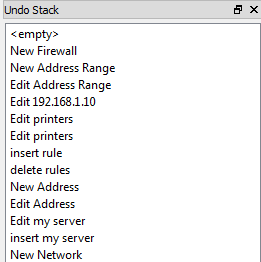
Displayed on the right side of the window, the Undo Stack is not displayed by default. To activate it, select . As you make changes to your object file, those changes show up in the Undo Stack window. You can "undo" an action by clicking the action above it (in other words, prior to it) in the window. Clicking any action in the window rolls back all changes after that action. However, the "future" changes stay in the Undo Stack until you make another edit. At that point, all changes after the current point in the stack are removed. The Undo Stack can "float" as its own window by clicking the button at the top of the panel next to the close button. See Section 4.4.1 for a more detailed explanation of the Undo Stack window.
|
You can open more than one object file window at a time, and you can copy objects between them. See Section 4.6 for an example of working with multiple data files.
Copyright © 2000-2012 NetCitadel, Inc. All rights reserved.
Using free CSS Templates.


